Networking Performance with GigE Cameras
In order to get optimal performance from GigE cameras while doing CPU intensive tasks you should optimize your network settings. Default settings of many network interface cards will cause high jitter in image transfer times and maybe even frame loss when the processors is under load.
Background
On some computers you might observe high packet loss counts when doing CPU intensive work (e.g. ComputeDisparityMap) during image transfer. This causes significant jitter in transfer times due to the latency for resending packets and can eventually also lead to missing entire frames at rather low frame rates.
Solutions
The root cause is that the operating systems network stack cannot fetch data from the network card quick enough to get all data from the network card while the camera is streaming image data to the PC. The network card will then drop some packets and the camera driver needs to re-request the missing data packets from the camera after a short timeout period.
Update your Network Card Drivers
Check if the drivers for your network card are up to date and update them if necessary. You can usually download the newest drivers from the card manufacturer’s website.
You should also check that any energy saving settings are disabled for the network card. On Windows you can find this in the tab Power Management of the network adapter properties.
Setting Network Card Properties
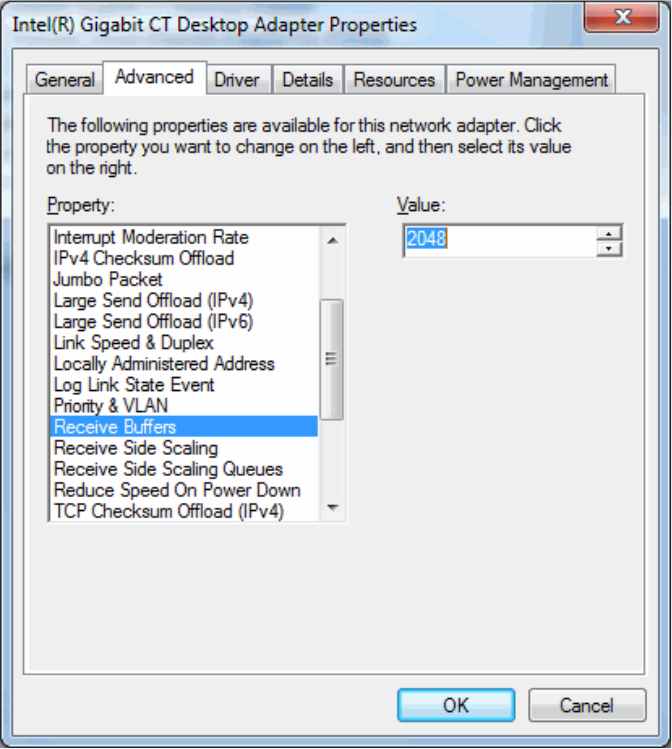
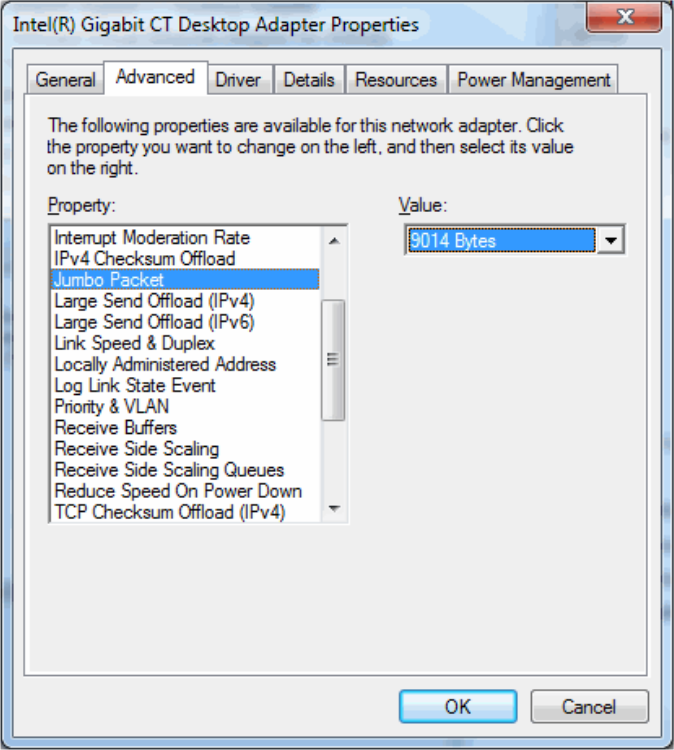
Make sure that the network card’s setting for receive buffer size and MTU are as high as possible.
On Windows you can open the Device Manager and open the properties dialog of your network card. Select the Advanced tab and try to locate properties for the receive buffers and set them as high as possible. Then find an entry for the MTU or Maximum Transmission Unit and set it as large as possible. The MTU setting is also sometimes listed as Jumbo Frames. Enable jumbo frames or set their frame size as large as possible.
On Debian/Ubuntu Linux you might be able to query receive buffers using
ethtool -g eth0
(assuming your network interface to the camera is eth0). To increase buffers to 2048 then simply run
ethtool -G eth0 rx 2048
You can change the MTU parameter using the command
ifconfig eth0 mtu 9000
Beware that the MTU setting is not persistent across reboots and you need to set it in /etc/network/interfaces or the corresponding location for your distribution to make the setting persistent.
Note
Not all network adapters support setting receive buffer or MTU parameters. This can usually only be done on integrated or PCIe cards which have DMA access to the main memory. Unfortunately we cannot give precise advice how to set the necessary parameters because the available settings and parameter names differ between vendors and even driver versions for the same product. Please contact your network card manufacturer in order to find out how to set receive buffer sizes on your system.
Lowering Packet Rate from the Camera
If you cannot resolve the problem via network card configuration you can try to decrease the camera’s pixel clock to lower the packet sending rate or specify a bandwidth limit. This will decrease the likelihood that the network card buffers overflow when the operating system’s response times to network traffic increase due to high CPU load.
Note
Lowering the pixel clock will cause slightly higher black level noise in the images as a side effect.